More Studio lighting tips…with DarkDaze
June 2, 2009
Last Friday when the studio was all empty for the late afternoon, DarkDaze decided to do a quick shoot with one of our favourite Garage Studios models, Elin.
The challenge in shooting the same model a lot of times is trying to get something different out of the pictures- we didnt have an editorial in mind, and thought about using some Ophelia Fancy items from their new collection but we wouldnt be able to show you them until the collection hits the streets/shops in August. In the end Elin just bought a few pairs of socks with her and some underwear from home- we decided to keep it simple and had her do her own hair and make-up and just keep it very clean and normal.
The pocket wizards and a few of the Bowens had been hired out heads so DD was left with the old cable/sync lead issues- also as the lights he used where ‘snooted’ and turned down very low there was some issues of the lights ‘seeing’ each other and syncing properly. This little problem led to some very direct and simple lighting by necessity. All the images below were shot within 2 1/2 hrs and are very simple but effective set ups.

Elin at Garage Studios
This is the simple lighting test (digital) for the final shot on Polaroid- DD’s a strange one sometimes and shot the digital tests so as not to waste the Polaroid film- how times have changed….

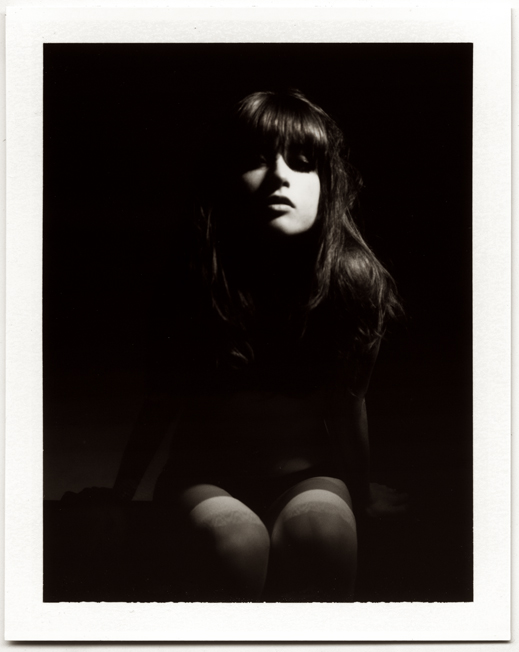
This shot is on a black sofa- but is a few feet from a white wall, in a white studio, you can see the the Light, which has a honeycomb modifier in it, is very direct and allows for a great amount of control over any spill light. (the three dots on the side are just on the film). Shooting down low allows the subject to ‘take charge’ of the image and this is heightened by the drama of an all black background.

Elin at Garage Studios with direct lighting
In this image with Elin leaning forward a very harsh, direct light hits her face. The light wasnt softened with a diffuser, umbrella etc and so is very high contrast from the honeycomb modifier. The focus is slightly soft as the 340 Polaroid is a Rangefinder that doesnt focus particularly close without use of close-up lens, but the image just holds. The small spill onto the white hold-ups helps keep the viewer in the frame.

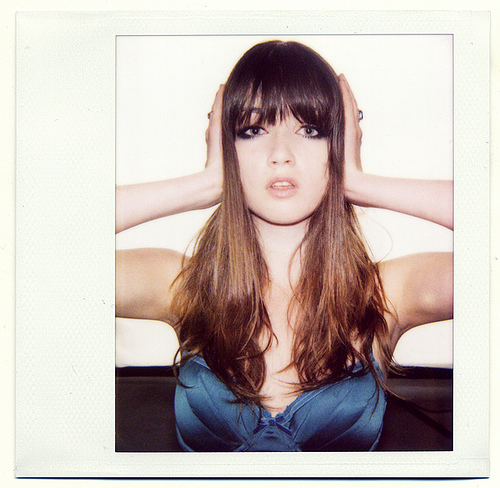
The polaroid is shot on a 1200 and is a simple on camera flash aimed into a softbox (the white behind Elins head), note the heavy shadow under the chin, and flash catchlights in the eyes.

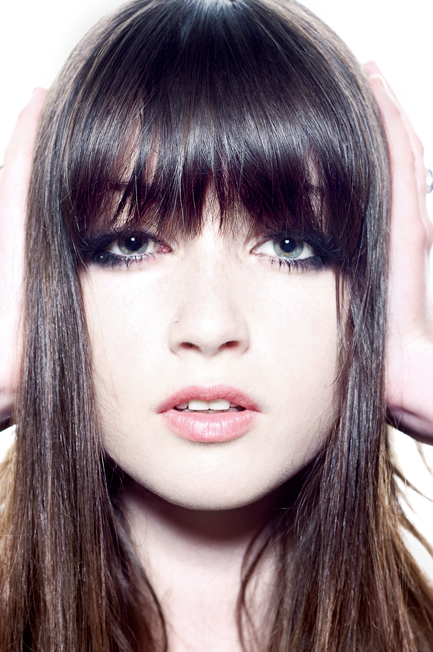
The final shot here is on a 50mm lens, shooting straight into a softbox (which is giving the diffused light around the hands and sides of Elins head). DD then pushed more light into her face, a high contrast very direct light. This gives a fairly direct comparison with the qualities of the polaroid. Shooting the light down onto Elins face gives a great shine to her hair, which really helps hold the form of her face, the heavy shadow works in this instance by bringing the face forward and allowing you to focus on the models eyes and mouth.
These are just a few very simple set-ups than can provide effective shots. The only thing we changed through the shoot was smoothing elins hair down in the final shots- but each image has a different ‘feel’ to it.
If you would like to learn more we offer both Studio Lighting and Flash lighting courses on a group or 1:1 basis. Go Here… we also offer model shoots for portfolio. If you need any headshots, bodyshots etc then please mail us at . Prices start at £75.
Hopefully you like these shots- never say we dont use our time wisely at GS….
Responses to More Studio lighting tips…with DarkDaze
-
Pingback: Dark Daze Photography » Archive » Elin.
-
This is a really interesting and useful blog post. Reading this, and also the one of SJ, where you have snooted under her chin so as to remove the under chin shadow, as opposed to here where you didn’t, made me suddenly go “oh, i get it”
Really finding these posts interesting.
-
cheers guys i am glad that your getting something out of these posts. andy you should check the honeycomb we have, works a treat. pete- yeah man its all shadows at the right time and place….


Nice post, I have tried to put together my own honeycomb filters for flash heads recently and not been able to achieve that extreme fall off.
I am intrigued to learn more about creating that extreme contrast shown on the close up without over exposing completely and losing all of the skin texture and tone.